Easy Way to Draw Long Anime Hair (6 Steps)
This guide shows how to draw long anime hair using a step by step approach. It provides illustrated examples and a line by line drawing video.
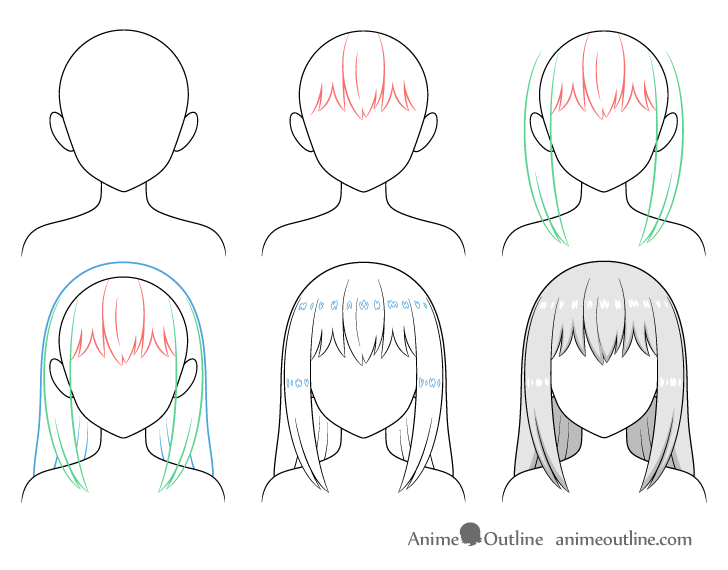
Long hair like that shown in this example can be seen in many anime and manga. It’s probably one of the most common and popular hairstyles. This tutorial provides an easy to follow and flexible approach to drawing it. It illustrates how you can add the different sections of the hair one step at a time and explains how you can change them if you wish to create a different look. You may be familiar with this method if you’ve tried some of the other hair drawing tutorials here on AnimeOutline. However, the unique part about this guide is it’s focus on long hair in particular.
Unless working digitally start the drawing in pencil and make fairly light lines as you will need to erase parts of the head/shoulders after outlining the hair.
Above is a quick video version of this guide. You can watch it to see how to draw long anime hair line by line. However, you should also read the more in depth instructions and explanations below.
If you like these types of video guides please be sure to leave a like and to subscribe to the AnimeOutline channel. Your likes and subscriptions are very helpful and much appreciated!
Step 1 – Make an Outline Drawing of the Head & Shoulders

Before you draw the hair create a basic outline of the head, neck and shoulders. As the focus of this guide is on the hair it does not go into the details of drawing these. You can simply use the above example for reference.
If you would like more information on structuring an anime head and face you can see the following tutorial:
How to Draw an Anime Face (Structure & Proportions)
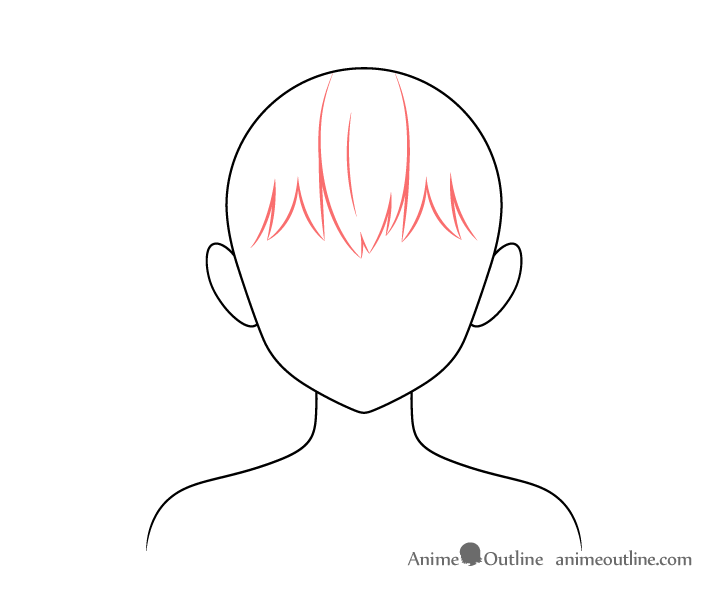
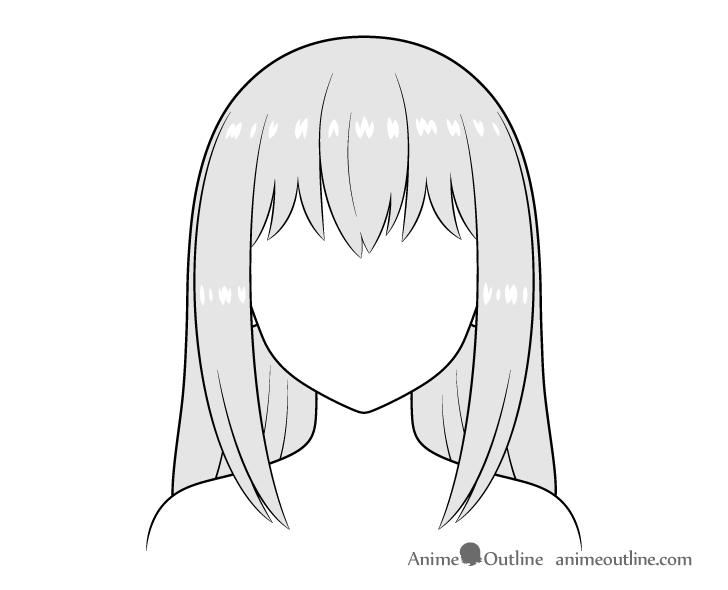
Step 2 – Draw the Hair Along the Forehead
Similar to other hair drawing guides here on AnimeOutline this one uses the approach of breaking the hairstyle down into different sections. You can read more about this in the following guide:
How to Draw Anime and Manga Hair – Female
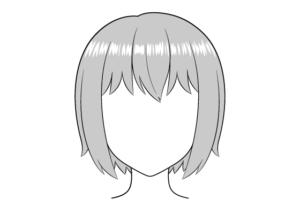
Start with the section along the forehead (also called bangs). Although the guide is about drawing long hair in this particular hairstyle the hair along the forehead is fairly short. Draw it as a series of clumps (for an anime/manga look) starting with a large one in the middle (with splits on it’s end) and smaller ones to it’s sides sides. Draw the side clumps swept more sideways the closer they are to the sides of the head. Drawing pointy hair clumps like the ones in this example will give the hair a more natural look. For a more traditional looking bangs you can draw it to be trimmed like in the following example:
How to Draw Anime “Hime Cut” Hairstyle
Alternatively, you could draw the forehead hair swept under the sides (added in the next step) as in the following guide:
How to Draw a Beautiful Anime Girl Step by Step
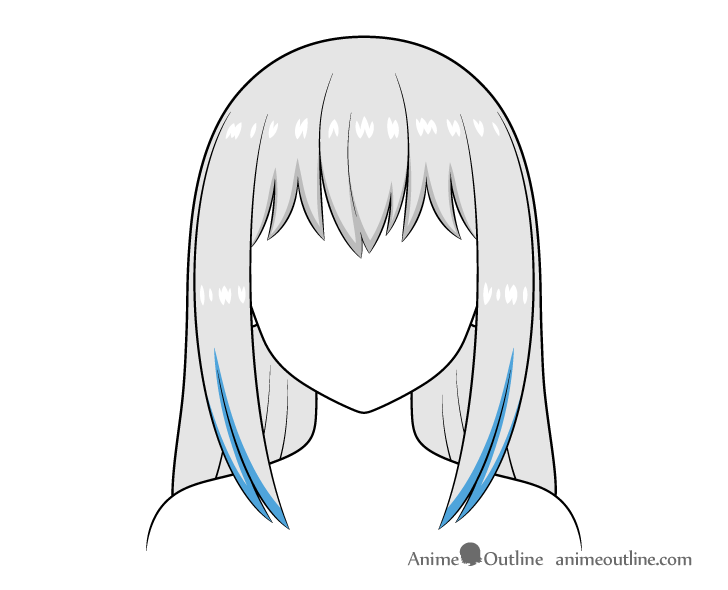
Step 3 – Draw the Hair Along the Sides Running Past the Shoulders
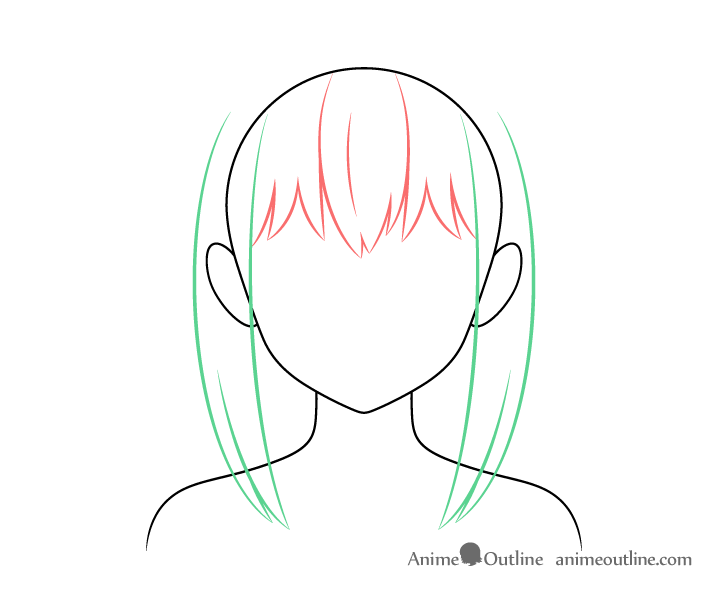
Add the hair along the sides of the head. As the goal is to create long hair draw these sections running down past the shoulders. Also, make them slightly curved (inwards around the head) and give them splits on their ends that transition into folds as they run upwards.
Again, similar to the previous step you can easily give these parts of the hair a different look if you prefer (shorter, longer, trimmed, etc…).
Step 4 – Draw the Hair in the Back Running Down Behind the Shoulders.

Finally, draw the hair on top and at the back of the head. Unlike the previous sections this one generally has a lot less variety. If you are drawing long hair that hangs down naturally (not tied into a ponytail, pigtails, buns, etc…) you can pretty much always draw this area of it similar to the example above.
For drawing hair that is tied see the following:
- How to Draw an Anime Ponytail (6 Steps)
- How to Draw Anime Short Pigtails Hairstyle
- How to Draw Anime Hair Buns Step by Step
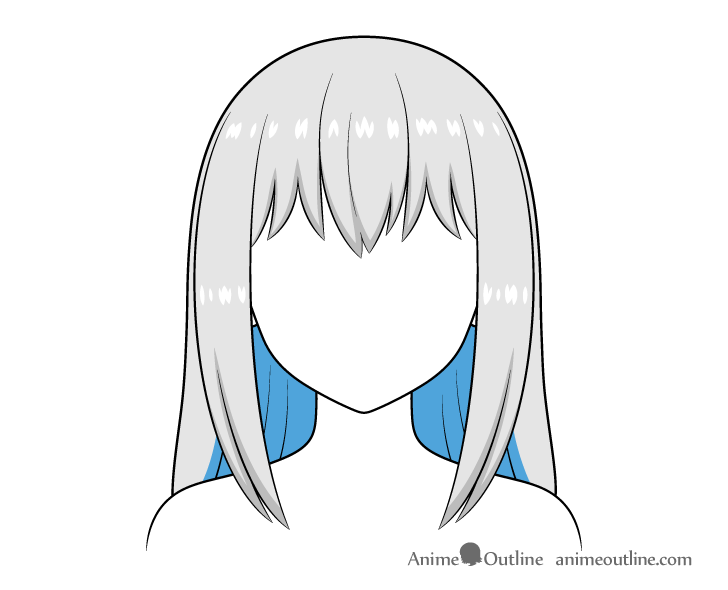
You can outline this part of the hair one half at a time starting from the top of the head. First, draw the hair in a way where it somewhat follows the head’s shape. Then draw it gradually moving away from it as it goes farther down. Make the outline particularly wide around the shoulders as the hair will tend to fan out further when it rests on them.
After you have the main outline of this section of the hair also define it’s inner area around the neck and add few hair folds into it. This will help show that this section curves around the head and make it look less like a flat “blob”. You can define the hair folds using curved lines that run up from the shoulders towards the bottom of the head.

After you’ve got the top/back hair outlined erase the parts of the head and shoulders that it covers. The goal of having the entire head outlined was to make it easier to see how much volume you are giving the hair and to help avoid mistakes.
For more on good drawing practices and common drawing mistakes see:
Once you’ve cleaned things up you can trace over your lines to darken them.
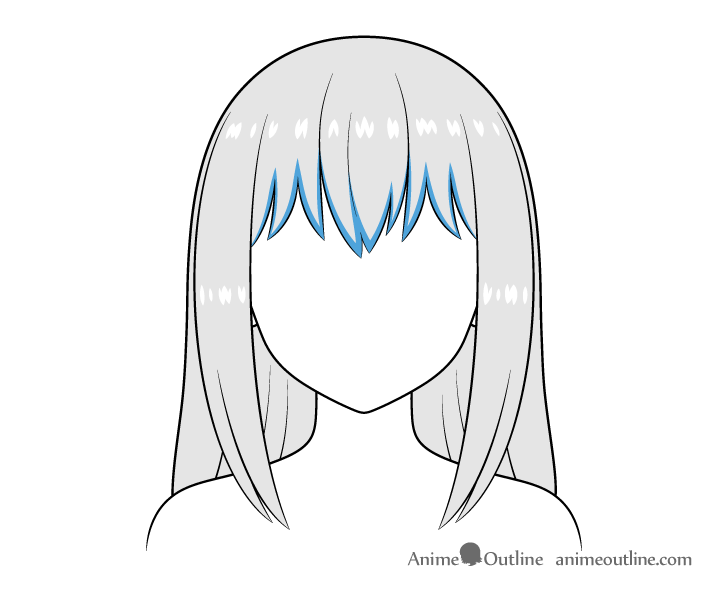
Step 5 – Outline the Reflections in the Hair
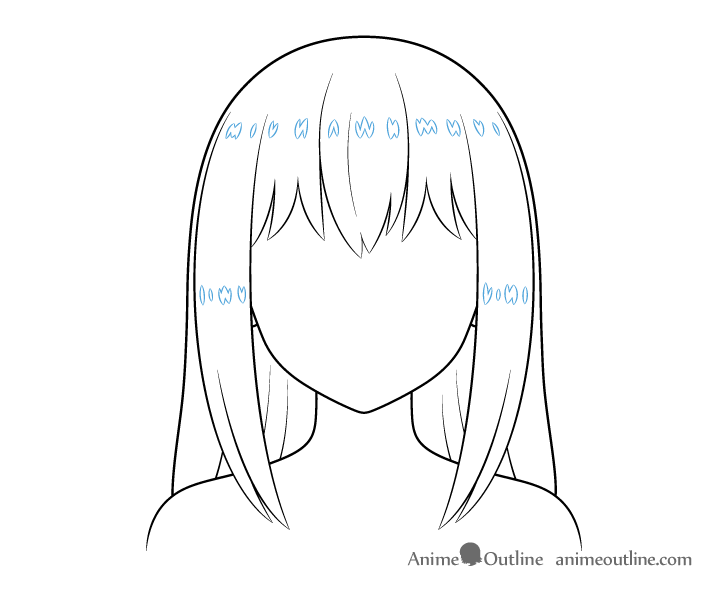
To help make the hair look shiny you can add some reflections. Depending how you are drawing you can either outline these beforehand or add them in over top of the color/shading.
If all you have is paper and a pencil it can be a good idea to very lightly outline the reflections before shading. If drawing digitally you can add them in a new layer (depending on software) over the color/shading.
Place the reflections in rows across the forehead and (optionally) along the sides of the hair. You can make their shapes similar to those in the example.
In addition to the examples shown in this tutorial there are also several other common ways to draw anime style hair reflections. For more on this see:
Different Ways to Draw Anime Hair Highlights
Step 6 – Add Shading to Finish the Long Hair Drawing
For this step either shade the hair grey with a regular pencil or make it any color you like. As this is anime hair you can really go with just about anything.
Be sure to leave the reflections white.
After adding the basic shading/color you can also add some shadows to help make the drawing stand out. The way you place the shadows depends on the kind of lighting you wish to convery. This example shows fairly generic looking shading that can work for most scenes of anime/manga (where the light is coming from above).
You can add the shadows in the same order you’ve added the hair sections. First, draw the shadows along the forehead area of the head. Place them along the bottom and side areas of the hair clumps. As the hair clumps curve inwards towards the head they will cast shadows on their own lower ends. Each clump will also tend to cast a shadow on the one besides it. Thus the reason for drawing the shadows as shown in the example.
As this is anime hair you don’t need to worry about gradients. Simply have hard transitions between the dark and light areas. Going for well defined edges also makes it easy easy to outline the shadows before darkening them. Simply do so with lines that are slightly darker than the color/shading and then darken the areas inside the outlines.
Add the shadows along the side sections similar to those along the forehead area.
Fully shade the inner area of the hair around the neck. As that part of the hair is fairly closed off from the light on all sides.
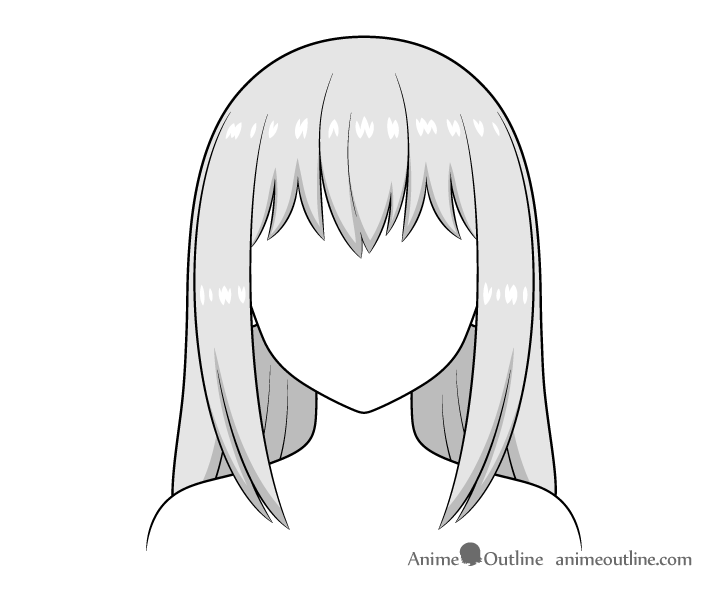
Once you’ve added the shadows you should hopefully have a drawing that is similar to the above.
Conclusion
Long hair is very common and popular in both anime and manga. While the focus is on this example in particular, as was already explained, you can easily tweak parts of the hair to create a different look.
By using the method shown in this guide and other similar guides on this site you can make the process of creating various anime hairstyles easier to manage.
For more tutorial on drawing anime and manga style hair also see the following:
- How to Draw Anime and Manga Hair – Female
- How to Draw Anime Hair in 3/4 View Step by Step
- How to Draw Anime Male Hair Step by Step
- How to Draw Hair in Wind Video Tutorial


")